

First Steps
First steps
Thank you for your interest in WayAndSee.
WayAndSee has been developed with the principle “the easiest possible use”.
All you have to do is choose the accuracy you prefer and whether WayAndSee should start and stop in the background. The rest happens automatically.
Main map
The Main map is the entry and will be displayed when WayAndSee starts.
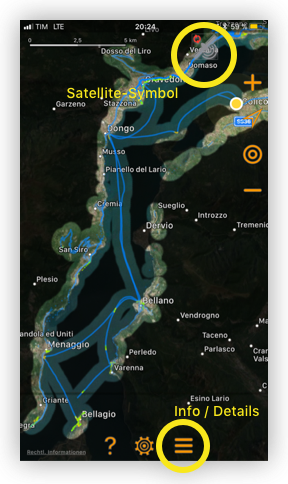
It is a standard IOS map that responds to the usual gestures in the usual way.
The peculiarity of WayAndSee is the cover, which is gradually removed by your way through the world.
The two most important buttons
In the upper area you can set the operating mode by the satellite symbol(will be explained next)
In the lower area you can call up the Info area by tapping the three stripes (see below)
The satellite icon
If you tap on the satellite symbol, the following screen mask appears.
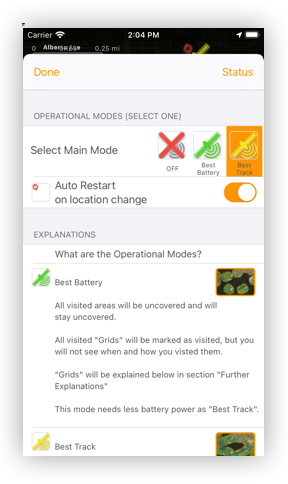
Here you can set the operating mode.
The usual mode (Best Quality and Auto Restart)
In our experience, four out of five users set “Best Quality” and enable “Auto Restart on location change”.
This is the most convenient way to use WayAndSee. WayAndSee automatically collects all necessary data in the background, you can be sure you will not miss anything and GPS will only be used if it makes sense.
The power consumption is then a bit higher, because the used in the iPhone / iPad for GPS hardware, of course, requires electricity.
But with “Auto Restart”, GPS will only be activated if it makes sense and is necessary.
In addition, the recording of the required data is optimized in the background for the lowest possible power consumption.
Auto Restart ON
“Auto Restart” starts and stops the recording automatically.
It detects whether the device is at rest or stays in the same place for a long time.
In these cases, the recording pauses automatically and restarts automatically if that changes.
WayAndSee uses the IOS functions “Region Monitoring”. “Region Monitoring” works very reliable, but a bit sluggish. It sometimes takes several minutes to detect a location change.
This has been deliberately designed by Apple. IOS makes every effort to consume as little power as possible when the device is “sleeping”.
The “lower” the device “sleeps”, the slower it reacts “Region Monitoring” … and thus “Auto Restart”.
Auto Restart OFF
If you turn Auto Restart OFF, you have to start manually by setting the operating mode to “Best Battery” or “Best Quality”. Then the recording turns on and stays on.
The recording must later be stopped manually by setting the operating mode to “All Off”.
IOS turns off the recording after a few hours to be on the safe side, but that’s more likely to just forget that there’s still a recording in the background. That’s why IOS turns off only after a few hours.
We strongly recommend that you enable AutoRestart.
The power saving mode (Best battery)
This “Best Battery” consumes less battery power than “Best Quality”.
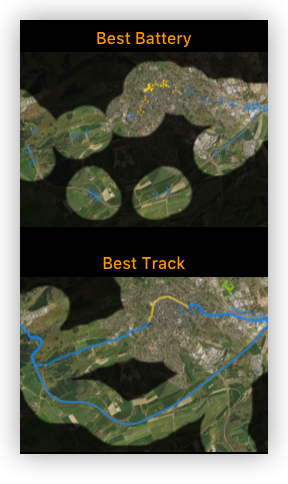
The current position is only determined every few minutes.
Of course, the recording has gaps, but the “density” is quite sufficient to determine later, in which area one was staying.
The power consumption in this mode is almost negligible.
The info area
Info selection screen
The first screen in the ** Info area ** has two main areas

In the upper area the overview of the SeeScore points is displayed. (Explanation below)
In the lower area you can select / select the type of information you want by tapping on the corresponding symbol at the bottom of the screen. The screen then displays the desired information.
Places: Hierarchical list of all visited addresses / places. The individual levels (eg: continents, countries, cities, etc.) can be folded.
Landmark: Hierarchical list of all visited Landmarks. Again, the individual levels can be folded
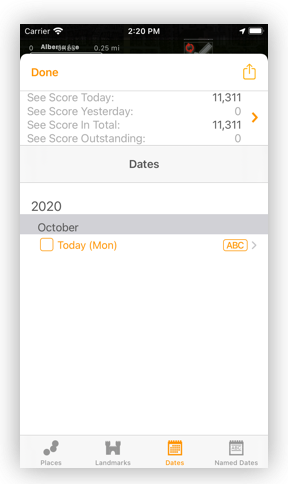
Days: Hierarchical list of all days that WayAndSee has collected data from. The (foldable) levels of the list are: Year, Month and Day
Named Days: You can summarize individual days (for example the days of a trip, see screenshot “2018 Visit to Apple”). These days you forgive the same name. such named days are displayed in this area.
If you type in one of the places, landmarks, days or named days, the info detail area appears
Info detail area
In the info-detail-area the following details can be seen:
Individual addresses and times, when and how long visited
Area map or Map with all the addresses of a day
Wikipedia entry of an address or period
Photos filtered by period or by location